
Angular Attribute Directive Nedir?
Angular Eğitim Serisine “Angular Attribute Directive Nedir?” konulu yazı ile devam edeceğim. Bir önceki yazımda “Angular Structural Directive Nedir” konulu yazıyı paylaştım.
Bu yazımda Angular Attribute Directive’ler ile DOM yapılarını nasıl manupule edeceğimizi, Angular ile nasıl custom attribute directive oluşturacağımızı anlatacağım. Bu directive’i uygulama içerisinde kullanıp, bolca kod örnekleri paylaşacağım.
Angular Eğitim Seti ile alakalı yazıların tamamına buradan ulaşabilirsiniz.
Keyifli okumalar 
Angular Attribute Directive
Önceki yazılarımda genel olarak directive’lerin işlevlerinden, neden kullanıldıklarından bahsetmiştim. Attribute Directive’ler de özetle Dom nesnelerini manipule etmeyi ve işlevlerini yönetmeyi sağlayan yapılardır.
Structural Directive’ler ile aralarındaki farklara bakacak olursak;
Attribute Directive
- Attribute directive’ler bir ögenin görünüşünü ve davranışını değiştirmek için kullanılırlar.
- Bir element üzerine farklı birden fazla Attribute Directive uygulanabilir.
- Ex : ngStyle , ngClass
Structural Directive
- Structural Directiveler Html Layout’undan sorumludur. Elemanlar ekleyerek, kaldırarak veya değiştirerek DOM’nun yapısını şekillendirir ve değiştirirler.
- Element üzerine yalnızca bir Structural Directive uygulanabilir.
- Ex : *ngIf , *ngFor
Angular ile hazır olarak kullanılabilir olan Attribute Directive’ler;
NgStyle
NgStyle Directive, DOM elementlerinin style property’sini yönetmemize olanak tanır.
<div [ngStyle]="{'background-color':'green'}"></<div>
Ya da bu directive sayesinde expression yazarak da elementin style özelliğini manipule edebilirsiniz;
<div [ngStyle]="{'background-color':person.city === 'Manisa' ? 'green' : 'red' }"></<div>
Bu örnekte person diye bir nesnemizin olduğunu ve bu nesnenin city property’si olduğunu düşünererk expression’ı geliştirdik. Eğer person.city = “Manisa” değişkenine sahip ise green değil ise background-color özelliğinin red değerini almasını sağladık ve bunu kolayca geliştirdik. Directive’ler hayat kurtarır.
Basit bir component oluşturarak daha anlaşılır hale getirelim;
ngstyle.component.html
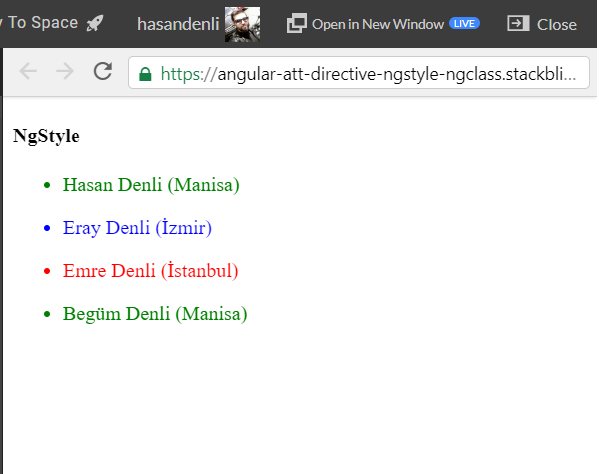
<h4>NgStyle</h4>
<ul *ngFor="let person of people">
  <li [ngStyle]="{'color':getColor(person.city)}"> {{ person.name }} ({{ person.city }})
  </li>
</ul>
ngstyle.component.ts
import { Component, Input } from '@angular/core';

@Component({
  selector: 'app-ngstyle',
  templateUrl: './ngstyle.component.html'
})
export class NgStyleComponent  {
  name = 'Angular';
   getColor(country) {
    switch (country) {
      case 'Manisa':
        return 'green';
      case 'İzmir':
        return 'blue';
      case 'İstanbul':
        return 'red';
    }
  }

  people: any[] = [
    {
      "name": "Hasan Denli",
      "city": 'Manisa'
    },
    {
      "name": "Eray Denli",
      "city": 'İzmir'
    },
    {
      "name": "Emre Denli",
      "city": 'İstanbul'
    },
    {
      "name": "Begüm Denli",
      "city": 'Manisa'
    }
  ];
}
ve çıktı;
NgClass
NgClass Directive, NgStyle Directive’ine çok benzer bir şekilde, DOM elementlerinin class property’sini yönetmemize olanak tanır.
ngclass.component.html
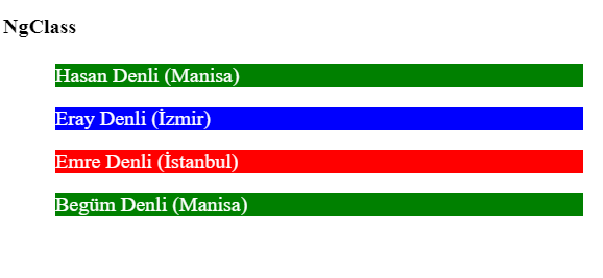
<h4>NgClass</h4>
<ul *ngFor="let person of people">
  <li [ngClass]="{
    'manisa':person.city === 'Manisa',
    'izmir':person.city === 'İzmir',
    'istanbul':person.city === 'İstanbul'
  }">{{ person.name }} ({{ person.city }})
  </li>
</ul>
*ngFor Structural Directive’ini kullanarak people dizisi kadar li elementinin oluşmasını sağladık. Burada “ngClass” Directive’i sayesinde condition ile dom elementinin class attribute’ünü yönetebildiğimiz için yukarıdaki gibi kodumuzu geliştirdik.
ngclass.component.css
.manisa{
  background-color: green;
  color:white;
}


.izmir{
  background-color: blue;
  color:white;
}


.istanbul{
  background-color: red;
  color:white;
}
import { Component, Input } from '@angular/core';


@Component({
  selector: 'app-ngclass',
  templateUrl: './ngclass.component.html',
  styleUrls: ['./ngclass.component.css']
})
export class NgClassComponent  {
  name = 'Angular';
   getColor(country) {
    switch (country) {
      case 'Manisa':
        return 'green';
      case 'İzmir':
        return 'blue';
      case 'İstanbul':
        return 'red';
    }
  }


  people: any[] = [
    {
      "name": "Hasan Denli",
      "city": 'Manisa'
    },
    {
      "name": "Eray Denli",
      "city": 'İzmir'
    },
    {
      "name": "Emre Denli",
      "city": 'İstanbul'
    },
    {
      "name": "Begüm Denli",
      "city": 'Manisa'
    }
  ];
}
ve çıktı;
Görüdünüz gibi Directive kullanarak view tarafında dom nesnelerini bu şekilde yönetmek çok kolay Şimdi biraz daha işi ileriye taşıyalım. Custom bir directive yazalım ve bunu uygulama içinde kullanalım.
Custom Angular Attribute Directive Oluşturma
Angular, @Directive decorator sayesinde custom directive’ler oluşturabilmemizi ve geliştirdiğimiz uygulamaların view katmanında çok kolay işler yapmamızı, kod tekrarlarından kurtulmamızı ve daha hızlı kod geliştirmemizi sağlıyor. Zaten bu kadar güçlü bir framework kullanıyor iseniz, uygulamanızın ihityaçları doğrultusunda nimetlerinden de faydalanmak gerekir diye düşünüyorum.
Neyse konumuza dönelim. Angular CLI’dan yardım alarak,
ng generate directive <directive-name>
syntax’ı ile directive oluşturabilirsiniz. Ben “highlight” adıyla bir directive oluşturdum ve aşağıdaki kodları ekledim.
import { Directive, ElementRef, HostListener, Input } from '@angular/core';

@Directive({
  selector: '[appHighlight]'
})
export class HighlightDirective {

  constructor(private el: ElementRef) { }

  @Input() defaultColor: string;

  @Input('appHighlight') highlightColor: string;

  @HostListener('mouseenter') onMouseEnter() {
    this.highlight(this.highlightColor || this.defaultColor || 'red');
  }

  @HostListener('mouseleave') onMouseLeave() {
    this.highlight(null);
  }

  private highlight(color: string) {
    this.el.nativeElement.style.backgroundColor = color;
  }
}
Yukarıdaki gibi HighlightDirective sınıfı @Directive decorator ile işaretlendi. Aynı zamanda proje içinde kullanabilmek için app.module.ts içinde declarations listesine eklendi. selector: [appHighlight] sayesinde kullandığımız html içindeki elemente bu directive’i inject edeceğiz.
Biraz kodları açıklayalım;
constructor(private el: ElementRef) { }
ElementRef; Angular/Core paketi üzerinden gelir. Directive sınıfı içinde ‘import { Directive, ElementRef, HostListener, Input } from ‘@angular/core’; ‘ ile bu özelliği kullanıyoruz ve constructor’da yukarıdaki gibi tanımladığımızda, directive’i inject ettiğimiz elementin bütün özelliklerine bu class sayesinde erişip yönetebilir durumda oluyoruz.
private highlight(color: string) {
this.el.nativeElement.style.backgroundColor = color;
}
@Input() defaultColor: string;
Directive’in uygulandığı element üzerinden default rengi alabileceğimiz parametre.
<p [appHighlight]="color" defaultColor="violet">
  Highlight me too!
</p>
@Input(‘appHighlight’) highlightColor: string;
Dikkat ederseniz @Input’un alias’ı, directive’de kullanacağımız selector (selector: ‘[appHighlight]’) ile aynı. Bu sayede directive elementi üzerinden HighlightDirective class’ı içine değişken alabileceğiz.
<p [appHighlight]="'yellow'">Highlighted in yellow</p>
app.module.ts
import { NgModule } from '@angular/core';
import { BrowserModule } from '@angular/platform-browser';
import { FormsModule } from '@angular/forms';

import { AppComponent } from './app.component';
import { NgStyleComponent } from './ngstyle.component';
import { NgClassComponent } from './ngclass.component';
import { HighlightDirective } from './highlight.directive';

@NgModule({
  imports:      [ BrowserModule, FormsModule ],
  declarations: [ AppComponent, NgStyleComponent, NgClassComponent,HighlightDirective],
  bootstrap:    [ AppComponent ]
})
export class AppModule { }
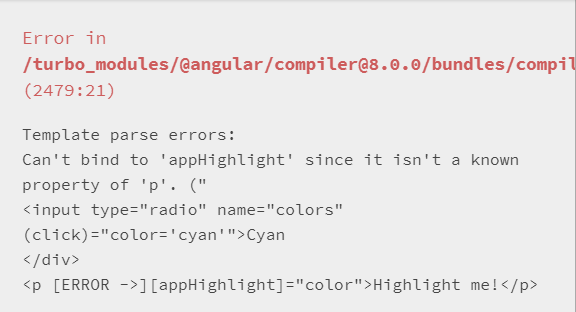
Eğer Directive’i AppModule içindeki declarations listesi içinde tanıtmazsak ve directive’i uygulama içinde kullanırsak; Angular, runtime’da aşağıdaki gibi ‘Template parse error‘ hatası verecektir.
Devam edelim ve yeni bir component oluşturalım;
custom-directive.component.ts
import { Component, OnInit } from '@angular/core';


@Component({
  selector: 'app-custom-directive',
  templateUrl: './custom-directive.component.html',
  styleUrls: ['./custom-directive.component.css']
})
export class CustomDirectiveComponent implements OnInit {

  color: string;

  constructor() { }

  ngOnInit() {
  }

}
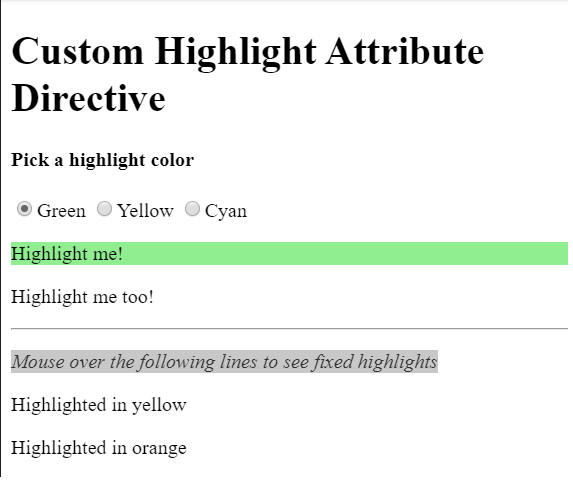
custom-directive.component.html
<h1>Custom Highlight Attribute Directive</h1>

<h4>Pick a highlight color</h4>
<div>
  <input type="radio" name="colors" (click)="color='lightgreen'">Green
  <input type="radio" name="colors" (click)="color='yellow'">Yellow
  <input type="radio" name="colors" (click)="color='cyan'">Cyan
</div>
<p [appHighlight]="color">Highlight me!</p>


<p [appHighlight]="color" defaultColor="violet">
  Highlight me too!
</p>


<hr>
<p><i>Mouse over the following lines to see fixed highlights</i></p>


<p [appHighlight]="'yellow'">Highlighted in yellow</p>
<p appHighlight="orange">Highlighted in orange</p>
app.module.ts
import { NgModule } from '@angular/core';
import { BrowserModule } from '@angular/platform-browser';
import { FormsModule } from '@angular/forms';

import { AppComponent } from './app.component';
import { NgStyleComponent } from './ngstyle.component';
import { NgClassComponent } from './ngclass.component';
import { CustomDirectiveComponent } from './custom-directive/custom-directive.component';
import { HighlightDirective } from './highlight.directive';

@NgModule({
  imports:      [ BrowserModule, FormsModule ],
  declarations: [ AppComponent, NgStyleComponent, NgClassComponent,CustomDirectiveComponent, HighlightDirective],
  bootstrap:    [ AppComponent ]
})
export class AppModule { }
Run;
Özet
Bu yazıda; Mobilhanem üzerinde yayımlamaya başladığım Angular Eğitim Seti yazı serisinden Angular Attribute Directive konusunu işledik. Angular içindeki hazırda bulunan bazı Attribute Directive çeşitlerinini örneklerle açıkladık. Nasıl Custom bir Attribute Directive oluşturacağımızdan ve uygulama içerisinde nasıl kullanacağımızdan bahsettik.
Eğer bir önceki Angular Structural Directive Nedir? konulu yazımı okumadıysanız konu bütünlüğü açısından okumanızı tavsiye ederim.
Bu yazınında sonuna geldik. Yorumlarınız benim için değerli. Yorumlarınızı bekliyorum. Bir sonraki yazımda görüşmek üzere.
Yararlı Linkler
https://angular.io/guide/attribute-directives
https://angular.io/api/common/NgStyle
https://angular.io/api/common/NgClass
https://angular.io/cli/generate
51

 Slack Grubumuza Üye Oldunuz mu ?


Son Yorumlar