
Merhaba Arkadaşlar,
Mobilhanem.com sitemiz üzerinden anlattığımız/yayınladığımız Android Eğitimleri yazı serimizde bu dersimizde Android FrameLayout Kullanımı ile devam ediyoruz. Nedir bu FrameLayout kavramı ,ne işe yarar şimdi incelemeye başlayalım.
FrameLayout ile android bileşenlerinin üst üste gelmesini sağlayabiliriz. Örneğin bir resminiz var üzerinde isim yazmasını veya puan yazmasını istiyoruz işte o zaman FrameLayout kullanmamız en mantıklı çözüm olacaktır.
<FrameLayout
    xmlns:android="http://schemas.android.com/apk/res/android"
    android:layout_width="match_parent"
    android:layout_height="match_parent">
    <ImageView
        android:layout_width="match_parent"
        android:layout_height="match_parent"
        android:scaleType="center"
        android:src="@drawable/img" />
    <TextView
        android:layout_width="wrap_content"
        android:layout_height="wrap_content"
        android:layout_marginBottom="10dp"
        android:layout_gravity="center_horizontal|bottom"
        android:padding="10dp"
        android:background="#cccc"
        android:textColor="#ffffffff"
        android:text="New York" />
</FrameLayout>
Ekran çıktımız:

Dinamik Android Layout Oluşturma
import android.graphics.Color;
import android.support.v7.app.AppCompatActivity;
import android.os.Bundle;
import android.view.Gravity;
import android.widget.FrameLayout;
import android.widget.ImageView;
import android.widget.TextView;

public class MainActivity extends AppCompatActivity {

    @Override
    protected void onCreate(Bundle savedInstanceState) {
        super.onCreate(savedInstanceState);
        //setContentView(R.layout.activity_main);

        ImageView img = new ImageView(this);
        FrameLayout.LayoutParams imageParams = new FrameLayout.LayoutParams(FrameLayout.LayoutParams.MATCH_PARENT,
                FrameLayout.LayoutParams.MATCH_PARENT);
        img.setImageResource(R.drawable.icon);
        img.setLayoutParams(imageParams);

        TextView txt = new TextView(this);
        txt.setText("New York");
        txt.setTextColor(Color.parseColor("#ffffffff"));
        txt.setPadding(10,10,10,10);

        FrameLayout.LayoutParams txtParams =
                new FrameLayout.LayoutParams(FrameLayout.LayoutParams.WRAP_CONTENT,
                        FrameLayout.LayoutParams.WRAP_CONTENT);
        txtParams.gravity = Gravity.CENTER_HORIZONTAL | Gravity.BOTTOM;
        txt.setLayoutParams(txtParams);


        FrameLayout outsideLayout = new FrameLayout(this);
        outsideLayout.setLayoutParams(new FrameLayout.LayoutParams(FrameLayout.LayoutParams.MATCH_PARENT, FrameLayout.LayoutParams.MATCH_PARENT));
        outsideLayout.addView(img);
        outsideLayout.addView(txt);
        setContentView(outsideLayout);


    }
}
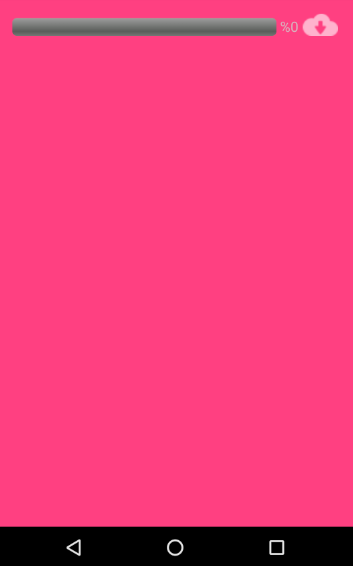
Bir şarkı indirme programı düşünelim ekranımızın en sağında indirme butonu olsun bastığımızda progress çıksın ve indirmeye başlasın ; indirme sırasında da indirmeden vazgeçtik diyelim ki iptal etme butonu olsun işte bu senaryo da uygulama ilk açıldığında indirme butonu aktif olarak gelecek indirme iconuna bastığımızda aynı yerdeki indirme butonu kaybolacak yerine iptal etme butonu gelecek. Gözümüzde canlandırdıysak eğer işte bu durumda o butonların aynı yerde konumlanabilmesi için yine FrameLayout kullanmamız gerekir. Aşağıdaki layout yapısına baktığımızda tam olarak bu anlattığım konuyu gerçekleştirdiğini göreceksiniz. ProgressBar ve TextView de indirme yüzdesi de yer almakta fakat o kısımları şimdilik unutun asıl mantık indirme butonuna basıldığı anda iptal etme butonunun gösterilmesi ve ikisininde aynı yerde konumlandırma yapmasıdır.
<RelativeLayout
    android:background="@color/colorAccent"
    xmlns:android="http://schemas.android.com/apk/res/android"
    android:layout_width="match_parent"
    android:layout_height="match_parent">


    <FrameLayout
        android:layout_marginRight="20dp"
        android:layout_marginTop="20dp"
        android:id="@+id/frameLayout"
        android:layout_alignParentEnd="true"
        android:layout_alignParentRight="true"
        android:layout_width="wrap_content"
        android:layout_height="wrap_content">


        <Button
            android:id="@+id/downloadButton"
            android:layout_width="40dp"
            android:layout_height="25dp"
            android:background="@drawable/download"
            android:paddingLeft="8dp"
            android:paddingRight="8dp"
            android:paddingTop="8dp" />

        <Button
            android:id="@+id/cancelButton"
            android:layout_width="40dp"
            android:layout_height="25dp"
            android:background="@drawable/cancel"
            android:paddingLeft="8dp"
            android:paddingRight="8dp"
            android:paddingTop="8dp"
            android:visibility="invisible" />


    </FrameLayout>


    <LinearLayout
        android:orientation="vertical"
        android:layout_width="match_parent"
        android:layout_height="wrap_content"
        android:weightSum="1"
        android:id="@+id/linearLayout6">

    </LinearLayout>

    <ProgressBar
        android:id="@+id/progress"
        style="@android:style/Widget.ProgressBar.Horizontal"
        android:layout_width="fill_parent"
        android:layout_height="wrap_content"
        android:layout_alignBottom="@+id/frameLayout"
        android:layout_marginRight="30dp"
        android:layout_marginLeft="20dp"
        android:layout_alignParentLeft="true"
        android:layout_alignParentStart="true"
        android:max="100"
        android:progress="0"
        android:layout_toLeftOf="@+id/frameLayout"
        android:layout_toStartOf="@+id/frameLayout" />

    <TextView
        android:textColor="#cccc"
        android:layout_marginRight="5dp"
        android:gravity="center_vertical"
        android:text=""
        android:textSize="16sp"
        android:layout_width="wrap_content"
        android:layout_height="wrap_content"
        android:id="@+id/txtPercentage"
        android:layout_alignBottom="@+id/progress"
        android:layout_toLeftOf="@+id/frameLayout"
         />

</RelativeLayout>
Ekran çıktımız:

Aşağıda gördüğünüz yapıda Notification Badge oluşturmaya çalıştık. Bildirim veya mesaj geldiğinde o bildiriminin sayısının kaç olduğunu göstermek için çoğunlukla bu şekilde bir gösterim tercih ederiz. Bu yapı için hazır third party kütüphaneler var tabiki de fakat FrameLayout kullanımını daha iyi gözümüzde canlandırmak için aşağıdaki xml layout yapısını oluşturduk.
<?xml version="1.0" encoding="utf-8"?>
<FrameLayout
    style="?attr/actionButtonStyle"
    xmlns:android="http://schemas.android.com/apk/res/android"
    android:layout_width="wrap_content"
    android:layout_height="wrap_content"
    android:layout_gravity="right"
    android:clipToPadding="false">

    <ImageView
        android:layout_width="wrap_content"
        android:layout_height="wrap_content"
        android:layout_gravity="center"
        android:src="@drawable/message_icon"/>

    <TextView
        android:id="@+id/badge_icon"
        android:layout_width="20dp"
        android:layout_height="20dp"
        android:background="@drawable/badge"
        android:gravity="center"
        android:layout_gravity="right|end|top"
        android:layout_marginLeft="-5dp"
        android:layout_marginRight="-5dp"
        android:layout_marginTop="3dp"
        android:textColor="#ccc"
        android:text="0"
        android:textSize="11sp"/>

</FrameLayout>
badge.xml
<?xml version="1.0" encoding="utf-8"?>
<shape xmlns:android="http://schemas.android.com/apk/res/android" android:shape="oval">

    <solid android:color="@android:color/holo_red_dark"/>
    <stroke android:color="@android:color/white" android:width="1dp"/>

</shape>
Ekran çıktısı:

Evet arkadaşlar Android FrameLayout Kullanımı‘nı sizlere detaylıca anlatmaya çalıştım. Bir sonraki dersimizde layout serisinden devam edeceğiz o zamana kadar layout lar ile ilgili konuları incelemeniz faydalı olacaktır.
Tüm Android Ders, Proje ve Kaynak Kodlar için tıklayınız.
Mobilhanem.com üzerinden anlattığımız android uygulama geliştirme derslerine devam edeceğiz. Konu hakkında sorunuzu yorum alanından sorabilirsiniz. Konu dışı sorularınızı ve tüm yazılımsal sorularınızı sorucevap.mobilhanem.com sitemizden de sorabilirsiniz.
Bir daha ki dersimizde görüşmek dileğiyle..
12


 Slack Grubumuza Üye Oldunuz mu ?


Son Yorumlar